Sunday, November 29, 2009

SrushtiSoft Open Source: AppUpdater 2.0


Its been observed that there were quite less Application Updater components available for DotNet developer community (perhaps, popularly only two such components, Microsoft Updater Application Block and WindowsClient.net component). so we worked-out little extra and open sourced our in-house AppUpdater component on codeplex.


Why should you consider to use SrushtiSoft's AppUpdater 2.0? (No, we are not competing with anyone, we are just excited to highlight AppUpdater features here.. :)

- Configuration driven: That means it does not require to study its complete architecture and write lot many lines code to integrate with your application. You just have to understand AppUpdater's 2 configuraton files. That's it!

- User Orientation: Download your update files from online in asynchronous mode along with  advertising your web site pages on updater window. 
- Integration: You can tweak AppUpdater demo modules and quickly-easily integrate with your dotnet desktop application.

- Extensible: Write custom Pre and Post update actions in your favorite dotnet language and publish, AppUpdater will run it on client machine software update is taking place.
- Simple: Yes, we follow 'Keep It Simple and Stupid (KISS)' programming approach.


We are keen to know what do you think. So download AppUpdater 2.0 and let us know your thoughts.

Friday, May 15, 2009

QQ OCR Feature - Extract Text from Scanned Images

If you have text content scanned as TIF image, Quick Quest can read it through its OCR feature integrated with question entry window. This post walk you through on how to accomplish this.

Go to question entry window


Look for an OCR button in the location shown below and click it.


OCR window will come up


Click Browse button and select the file from which you want to extract the content


Once the image is loaded, hit “Extract Text” and you are done!


You can edit extracted text if wish and finally click “Export Scanned Data” to get scanned content on Quest entry area.

Saturday, March 7, 2009

Question Paper Compose and Generation

The Quick Quest window has several important yet simple to use features and this post try to highlight those in brief. You are always encouraged to reach us on our support email ID: quickquest at srushtisoft dot com to avail more help and assistance.


Generate Question Paper
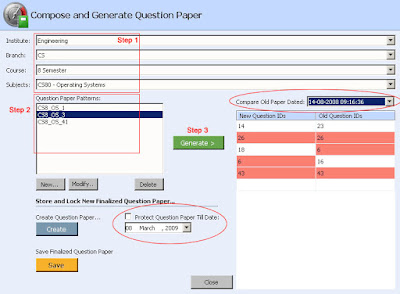
Step 1: Select a subject for which you want to create a questions paper by properly choosing Faculty, Branch and Course from the drop down boxes.
Step 2: Chose one pattern from “Question Paper Pattern” list.
Step 3: Click “Generate” green button to create a question paper.
If you are able to see question IDs populated in the chart located next to the green “Generate” button, that means a new questions paper is generated and ready to secure or publish!
If Quick Quest Engine encounters any error while generating questions paper, it will show you a clear error message stating what went wrong. Please read it carefully to fix it.

Compare with Old Question Paper.

The drop down box labeled as “Compare Old Paper Dated”, lists out all previously generated and saved question papers for a selected subject. Otherwise the drop down box will be empty.
Choose a paper from Old papers list. You will see set of question numbers populated right hand side of the new questions chart and repeated question are marked with red background color.
The old papers drop down list displays previously conducted exam dates. Choosing a date entry from “Compare Old papers date” list will populate question IDs used in the questions paper distributed in the exam halls.

Create Question Paper

The “Create” button generates questions paper with the format designed in Pattern Editor and displays it. The display window allows you to apply font, size, print previewing and other formatting as per your requirement.
You can also edit the bare question paper in your favorite word processing software like MS Word. To do that, copy (CTRL+A and CTRL+C) the bare question paper, open your favorite word processing software and paste the content in a new document. Once you finish doing all formatting your word processing software, copy the whole content and paste back to Quick Quest question paper window and press OK.

Protect Question Paper
When you are done with questions paper formatting, you can now lock the paper to avoid questions paper leak.
Check “Protect Question paper till date” and press “Save”.
Now, only admin user can only able to view the question paper.